|
|
Posted By RCI,
Tuesday, July 21, 2020
Updated: Thursday, July 30, 2020
|
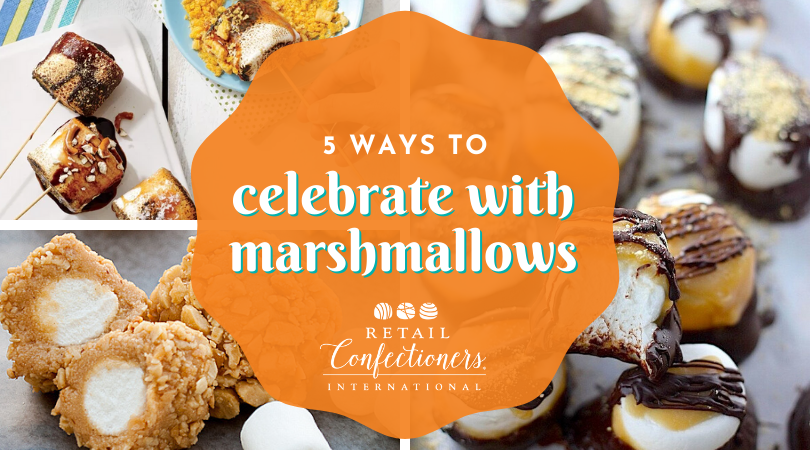
August is the unofficial marshmallow month—with National S’mores Day on August 10 and National Toasted Marshmallow Day on August 30. Marshmallows originated in Ancient Egypt. They were made from the sweet, gooey sap extracted from the mallow plant and mixed with honey to make candy. The sticky treat was so good, it was reserved exclusively for royalty. We thought it fitting to elevate the marshmallow by debunking the idea that they’re just for campfires with five ways to celebrate with marshmallows. Gourmet Marshmallows
There’s nothing quite like homemade marshmallow. Put the jet-puffed variety to shame and experiment with this recipe for gourmet marshmallows from Delish.com. Plus, we’ve got troubleshooting tips from RCI’s past blog post—click here to read more. S’mores Fudge Bars
Made with a buttery graham cracker crust, generous layer of rich chocolate and topped with gooey toasted marshmallow, these s’mores fudge bars would be difficult for anyone to pass up. Fun fact: According to the National Confectioners Association (NCA), more than 50 percent of all marshmallows sold are eventually toasted over a fire each summer (candyusa.com). Dark Chocolate Salted Caramel Dipped Marshmallows
Salted caramel amps up the flavor of chocolate-dipped marshmallows. With flavors this sophisticated, forget the campfire—crank up the kitchen torch and pass the graham crackers. Fluffer Nutter Bites
Love marshmallows? Love peanut butter? Who doesn't?! Don’t miss this recipe for gooey and crunchy Fluffer Nutter Bites. Get the recipe here. Roasted Marshmallow Toppings Kit
If they can build it, they will come. Bundled take-home kits have been a popular option for people spending more time at home. Let consumers build their own roasted marshmallow bar with a bundled kit that’s perfect for small gatherings or an easy after-dinner treat. This twist on s’mores replaces chocolate bars with chocolate sauce and caramel sauce to coat toasted marshmallows before rolling them in any variety of crunchy topping like roasted nuts, pretzel pieces and crushed candy bits. Don’t forget to include wooden skewers as part of your kit. Highlight your gourmet treats this summer with fun ways to celebrate marshmallows. Crave more? If you like what you read here, look for the "Subscribe now" box on the right to enter your email address and start receiving weekly tips, like this, delivered straight to your email inbox. RCI's Tip of the Week blog is just one of the many resources we offer to help candy makers refine their craft and build upon their business and marketing practices. Not a member? Click here to learn how RCI can help you build your sweet business.
Tags:
Candy Holidays
Candy Making
Inspiration
Marshmallow
Recipe
S'mores
Summer
Permalink
| Comments (0)
|
|
|
Posted By RCI,
Tuesday, July 14, 2020
Updated: Thursday, July 30, 2020
|
Take action to protect your business against the threat of a product recall by better understanding the fundamentals of an effective traceability system from Dean Hornsby of Redimark. This article was originally published in RCI's Kettle Talk magazine.
In 2018, a total of 382 food product recalls were registered between the U.S. Food and Drug Administration (FDA), as well as the U.S. Department of Agriculture Food Safety and Inspection Service (USDA FSIS). What were the leading reasons for the recalls? Undeclared allergens accounted for 160 recall cases; milk, tree nuts, eggs, peanuts, soy and wheat representing the largest offenders. (foodsafetymagazine.com)
If you produce confectionery products, you are most likely sourcing ingredients from multiple suppliers that are derived from local and even international sources. You rely on your suppliers to keep track of these ingredients and provide the documentation for batch or lot identification. You would expect your suppliers to notify you if they had a quality or safety recall, but what about you? Would you know what products of yours would fall under that same product recall?
THE IMPORTANCE OF TRACEABILITY An effective product traceability system involves the use of tracking and tracing systems and processes to record the movement of incoming goods to outgoing product. Whatever system you use, it is important to capture the data of incoming ingredients quickly and accurately. The packaged products that you produce and ship need to be identified all the way back to the batches of ingredients used. - Once product is outside of your four walls, what now?
- Did you track where the product lot was shipped to?
- What about your customers or consumers?
- Would they be able to identify the offending batch of product?
This is the importance of product coding and identification. 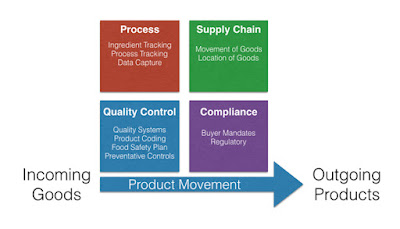 | Above: Key areas of consideration for a traceability system |
HOW TO TRACK PRODUCTS Not only should your product traceability system capture the data of incoming goods to outgoing shipments, it needs to index all production activities to a unique batch lot number such as a kettle or oven number, mixer, packaging line, etc. This primary-level batch lot number is the license plate that travels with the product all the way to the customer and consumer. If a supplier notifies you of an ingredient safety issue, your traceability system should support a “where-used” function that allows you to enter the secondary-level batch numbers of the ingredients used and all parent level batch numbers should show as a result. The same holds true for the production process activities. Should a metal mixing blade break, all batches produced from the last inspection date of the mixing blade up until the new inspection that found the failure must be identified.
CODING REQUIREMENTS The primary-level batch code must be visible on your product packaging. It should not be printed on parts of the packaging that can be discarded such as a tear-away opening or throwaway cap. It should be printed onto the permanent section of the packaging so that a consumer can locate the code for identification. Printing of the batch code can be performed by many different technologies. Inkjet coders offer the most flexible way to date and batch code products by jetting the ink drops that form printed characters onto the product as it travels down a product conveyor or through a flow wrapper. Labels can be printed inline using a print-and-apply system, or offline in batches that are hand-applied onto the product. Thermal Transfer Over printers (TTO) print directly onto the film in the flow wrapping process—Label and TTO technologies use wax ribbons for printing onto the label or plastic packaging substrate.
More expensive coders, like lasers, can be used to vaporize the package’s pre-printed ink surface to reveal contrasting date codes with the natural packaging material color underneath.
FSMA’S IMPACT ON TRACEABILITY The Food Safety Modernization Act (FSMA) impacts small manufacturers (fewer than 500 full-time equivalent employees) as of September 18, 2017 and very small businesses (less than $1,000,000 in sales) on September 17, 2018.
The FSMA is a law that enforces preventative control measures and enables the FDA to perform unscheduled inspections and force product recalls instead of issuing voluntary recalls. The law can even allow the FDA to force closure of production operations should improper preventative control measures be found regarding food safety.
An effective product traceability system delivers what your business needs to protect brand image, provide consumer trust, and meet your product quality and safety goals.
Crave more? If you like what you read here, look for the "Subscribe now" box on the right to enter your email address and start receiving weekly tips, like this, delivered straight to your email inbox. RCI's Tip of the Week blog is just one of the many resources we offer to help candy makers refine their craft and build upon their business and marketing practices.
Tags:
Traceability
Permalink
| Comments (0)
|
|
|
Posted By RCI,
Tuesday, July 7, 2020
Updated: Thursday, July 30, 2020
|
The label typically reads “sponge candy,” but you may also know this candy as cinder block, sea foam, fairy food, angel food or a multitude of other names. Each of these names are referring to the same type of candy with origins that are rather vague, but appear to have started in the Buffalo, New York area. Additionally, it can be found scattered from coast to coast in the northern third of the U.S. and some areas of Canada. For decades, Vande Walle’s Candies has been making sponge candy that keeps customers coming back for more. Keep reading as Tom Vande Walle shares the basics of this confection, plus tips and tricks for making sponge candy that customers crave. WHAT IS IT? What exactly is sponge candy? Basically, it is a hard candy to which baking soda is added, causing it to foam up, similar to that of a light, airy peanut brittle. Later gelatin is added to hold the foamy structure while the batch cools. When cool, the candy has a crisp, crunchy quality at first, but then will melt in your mouth. Sponge-type candy can be made with slight variations, such as substituting molasses or honey for some of the sugar, using different D.E. (dextrose equivalent) corn syrup or adding flavors such as orange or mint. Some recipes even call for vinegar. Though confectioners can make it differently, what keeps them similar is that they all have the same airy texture that soaks up moisture very easily. Perhaps these variations help explain why there are so many names for the same basic candy. HOW IS IT MADE? Making sponge candy is really not any more difficult than making peanut brittle. Here is a quick general rundown of the procedure for making sponge candy: Cook sugar, corn syrup and water to about 310°F/ 154°C. Let that mixture cool down to about 30°F/-1°C, then mix in gelatin and then add baking soda. Next, pour mixture into a square insulated box with a heavy floating cover and let cool overnight. The next morning, cut one to two inches of the candy off all the way around the outside of the block of candy with a handsaw and discard. Cut the remaining center into bite-sized pieces and enrobe in chocolate. SPECIAL CONSIDERATIONS When making sponge candy it is important to keep the following points in mind: - The gelatin must be completely mixed in before adding the baking soda or the result will be burnt streaks in the block after it is cool.
- Another cause of the center of the block to be burnt could be from not letting the batch cool enough before adding the baking soda. The baking soda must be mixed in and the batch poured out quickly if a fine texture is desired.
- Also, humidity that is too high, over 50%, after the candy is cooked will cause it to become gummy, especially after it is cut and before it is enrobed in chocolate.
- About half the weight of each batch will be trimmed from the outside of the block and will need to be disposed.
- The dust from cutting the block into pieces will settle on you and everything around you.
- The pounds per hour of production will be lower than many other candies due to its light weight.
- It can be sold with or without being enrobed in chocolate. If it is cut and packaged in low humidity conditions, it can have a shelf life of more than six months.
By any name, sponge candy is a highly sought-after confection in the northern region of the United States and Canada. Although it is a polarizing confection, those who love it, really love it and will buy it for themselves and for their loved ones during the holidays, for special celebrations and just because. Share in the comments below if you love sponge candy, what you call it and what area you are from. Crave more? If you like what you read here, look for the "Subscribe now" box on the right to enter your email address and start receiving weekly tips, like this, delivered straight to your email inbox. RCI's Tip of the Week blog is just one of the many resources we offer to help candy makers refine their craft and build upon their business and marketing practices. Not a member? Click here to learn how RCI can help you build your sweet business.
Tags:
Sponge Candy
Permalink
| Comments (0)
|
|
|
Posted By RCI,
Tuesday, June 30, 2020
Updated: Thursday, July 30, 2020
|
Have you ever experienced problems with caramel slipping off your caramel apples? The wax on your apple may be the culprit. By simply wiping each apple with a damp cloth prior to dipping, you can remove the waxy residue that rests on the apples. An apple naturally produces a waxy film to protect itself, however, in some instances additional food-grade wax is added by suppliers to further increase an apple’s shelf life. For this reason, it could save you time and effort to request unwaxed apples from your supplier, if they do add wax to their apples. If that doesn’t help, consider adding white compound to your caramel at a 5 to 1 ratio to help it better adhere to the apple. If you can’t wait to test this out, here’s a few summer-inspired caramel apples ideas to try too! Patriotic Caramel Apples
Show your patriotic stripes with drizzles of red and blue over a white chocolate coated caramel apple. 
Zesty Coconut Caramel Apples
Think tropical by adding a generous helping of toasted coconut and a little lime zest to your caramel apples. 
Wormy Caramel Apple
Turn shoppers heads with these fun, wormy caramel apples! S’mores Caramel Apples
Transform your caramel apples into a s’mores lover’s dream by adding layers of graham crackers, marshmallows and drizzled chocolate. Was this tip helpful? If so, let us know in the comments below. Crave more? If you like what you read here, look for the "Subscribe now" box on the right to enter your email address and start receiving weekly tips, like this, delivered straight to your email inbox. RCI's Tip of the Week blog is just one of the many resources we offer to help candy makers refine their craft and build upon their business and marketing practices. Not a member? Click here to learn how RCI can help you build your sweet business.
Tags:
4th of July
Apple
Candy Hacks
Caramel
Caramel Apple
Caramel Apples
Caramels
Coconut
Idea Sharing
Inspiration
Problem Candy
S'mores
Something on a Stick Day
Summer
Permalink
| Comments (0)
|
|
|
Posted By RCI,
Tuesday, June 23, 2020
Updated: Thursday, July 30, 2020
|
Whether you like it or not, tie-dye is one of the biggest fashion trends of 2020—no doubt thanks to quarantined DIYers looking to pass time and upcycle their wardrobes. Oftentimes popular fashion trends find their way into other industries. With all the fun, bright colors and happy vibes it creates, we think the tie-dye trend is a perfect fit for the candy industry. If you’re looking to jump on this psychedelic bandwagon, keep reading for five must-try tie-dye ideas. Tie-Dye S’mores Tie-dye + s’mores! Does it get any better than this? Whip up a batch of these colorful and gooey marshmallows and dare your customers NOT to plaster photos of them all over social media! They won’t be able to resist! Click here for a tutorial from Studio DIY. Tie-Dye Chocolate Bars Create yummy swirls of color on a chocolate bar, then take it a step further by embellishing it with a fun, little moulded chocolate piece—like this ice cream cone—and lots of sprinkles. Tie-Dye Moulded Chocolates You don’t even have to like tie-dye to love this colorful bunny! What other moulded chocolates would look great in tie dye? All of them! Tie-Dye Packaging What goes best with tie-dye? More tie-dye, of course! Complete your collection of tie-dye confections with equally psychedelic packaging. Contact MOD-PAC for more information about these tie-dye boxes. Tie-Dye Merchandise For the truest tie-dye enthusiasts, consider adding branded tie-die merch to your offerings, like these t-shirts from Asher's Chocolates. In the world of tie-dye, the possibilities are seemingly endless! These are just a few of our favorite ways for your business to ride the tie-dye trend. Similar techniques could also be applied to chocolate-covered sandwich cookies, pretzels, fudge and more. What confections would you transform with tie dye? Share in the comments below. Crave more? If you like what you read here, look for the "Subscribe now" box on the right to enter your email address and start receiving weekly tips, like this, delivered straight to your email inbox. RCI's Tip of the Week blog is just one of the many resources we offer to help candy makers refine their craft and build upon their business and marketing practices. Not a member? Click here to learn how RCI can help you build your sweet business.
Tags:
Colors
Creativity
Displays
Fudge
Ideas
Inspiration
Marketing
Marshmallow
Oreo
Oreos
Packaging
S'mores
Spring
Summer
Trends
Permalink
| Comments (0)
|
|
|
Posted By RCI,
Tuesday, June 16, 2020
Updated: Thursday, July 30, 2020
|
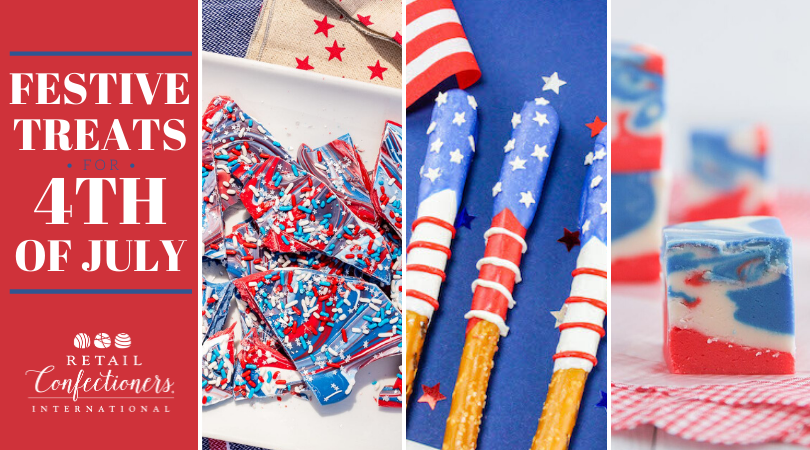
Here's some fun ideas for the Fourth of July! Transform your favorite sweets into your festive treats by adding a whole lot of red, white and ooooh! Patriotic Pretzels This sweet and salty treat will be hard to pass up with the addition of colored confectioners coating and sprinkles to resemble the American flag. Pop Rocks® Popcorn Offer a package of Pop Rocks® as an add-on to your festive white chocolate coated popcorn (or really add popcorn treat) for a little unexpected fun this Fourth of July. Click here to read our past blog post with more inspiration, plus a helpful tip for working with Pop Rocks® in confections. Freedom Bark Swirls of red, white and blue are a beautiful sight and make for a sweetly patriotic treat. Consider adding dried blueberries, cherries, cranberries or coconut for added flavor and texture while staying true to the color scheme. Fourth of July Tie-Dye Fudge Transform classic white chocolate fudge into a summer holiday hero! Consider a mash-up of blueberry and strawberry flavors to give it a fresh mixed berry vibe! This Fourth of July will certainly be one to remember! We hope this offers some inspiration for your holiday celebration. Crave more? If you like what you read here, look for the "Subscribe now" box on the right to enter your email address and start receiving weekly tips, like this, delivered straight to your email inbox. RCI's Tip of the Week blog is just one of the many resources we offer to help candy makers refine their craft and build upon their business and marketing practices. Not a member? Click here to learn how RCI can help you build your sweet business.
Tags:
4th of July
Bark
Candy Holidays
Celebrations
Colors
Fudge
Holidays
Inspiration
Labor Day
Memorial Day
Patriotic
Popcorn
Seasonal
Permalink
| Comments (0)
|
|
|
Posted By RCI,
Tuesday, June 9, 2020
Updated: Thursday, July 30, 2020
|
Impress your customers all year around with 3D moulded chocolates. RCI member, Chef Brian Donaghy with Tomric Systems shares step-by-step instructions for working with both solid and hollow moulds, plus important considerations when it comes to tempering and cooling. Start with Good Temper It seems fairly basic, but before we dive into moulding chocolate, I feel compelled to note that proper moulding techniques all start with chocolate in good temper. Good temper leads to appropriate viscosity (90˚F/32˚c or below for 3D moulding), which ultimately leads to better finished pieces, whether that be your three-foot hollow bunny, your solid chocolate Santa pop or the shell to that beautifully decorated artisan-style praline. We are always looking for bubble-free chocolate, of even thickness throughout the moulded piece with the beautiful shine and snap that will delight our customer. How can we get there? Solid Moulds Many 3D moulds are designed as an open or closed format. The open format allows the mould to be made hollow or solid, while the closed format only allows for hollow manufacturing. Solid forming is fairly straight forward; clip the two (or more pieces) together, fill with chocolate, (bubble-free is easier to achieve, if you vibrate the mould while filling) and set filled mould in a cool space with air flow—I prefer 50˚F/10˚C for my refrigeration temperature. Leave the mould there until you can see the chocolate pulling away from the inside of the plastic. If the chocolate piece experiences breakage during this time, I will often remove some of the clips and turn the mould onto its base to finish the crystallization process. Once the piece is ready to be unmoulded, I remove it from the cool space and allow it to return to room temperature before I unmould. Waiting this little bit, helps to prevent sugar bloom or condensation on the piece. If the mould has flash (chocolate on the seam that slipped between the plastic sides), cut it off with a utility knife or sharp paring knife and then use compressed air or a badger-style brush to remove the excess chocolate. Hollow Moulds The process for creating hollow moulded chocolates is similar to the solid, but after filling it while vibrating the mould, set the mould aside at room temperature for a couple minutes. Next, pour the chocolate from the mould back into the temperer. Repeat this process until the piece is the appropriate weight or thickness. Create the bottom of the piece, by pouring tempered chocolate onto a lined sheet pan, slightly bigger than the base of the mould. Stand the mould into that pool of chocolate and place the mould and sheet pan in a cool space. Like the solid piece, remove clips early if there is breakage, and bring the piece back to room temperature before unmoulding. The extra chocolate around the base of the mould can be easily removed prior to opening the mould by placing a knife between the mould and the chocolate, it should just break away if the chocolate is finished crystallizing. Cooling Time What amount of time is best to store chocolates in a cool space before removing the mould? This will depend on a few factors; the size of the mould, how much chocolate the mould uses and the actual temperature of the space. Regardless of these variables, remember that no matter the size, amount of chocolate or room temperature, you will get more consistent results if that space has moving air, because moulding chocolate that has been properly tempered requires heat exchange created by airflow. Follow this expert advice to achieve bubble-free moulded chocolates with a beautiful shine and snap. Crave more? If you like what you read here, look for the "Subscribe now" box on the right to enter your email address and start receiving weekly tips, like this, delivered straight to your email inbox. RCI's Tip of the Week blog is just one of the many resources we offer to help candy makers refine their craft and build upon their business and marketing practices. Not a member? Click here to learn how RCI can help you build your sweet business.
Tags:
Moulds
temper
Permalink
| Comments (0)
|
|
|
Posted By RCI,
Tuesday, June 2, 2020
Updated: Thursday, July 30, 2020
|
 In honor of National Coconut Day on June 26, we’re sharing troubleshooting tips for working with coconut as well as inspiration for developing a new, craveable coconut candy that will make your fans go loco for coconut this summer! Coconut can come in many forms, but for confectioners, desiccated coconut is the most popular. Desiccated is defined as, “preserved by drying,” according to Merriam-Webster. The process of making desiccated coconutinvolves shredding unsweetened coconut meat that has been dehydrated and sifted to a range of different sizes. Shelf Life and Storage
Desiccated coconut is a low-moisture, high-fat product. Approximately 3% moisture content is necessary for desiccated coconut to be shelf stable. If moisture content is 5% or above, dried coconut will mold and spoil rapidly. Poly bags are an effective barrier against moisture pick up in transit and storage. However, dry storage conditions for desiccated coconut is recommended to maximize shelf life. With a low moisture product, such as this, any candy formulation has to be adjusted for the drying effect of such an ingredient. An alternative to this formula adjustment, of course, the premoistening of the desiccated coconut before addition to the candy batch. Oil Separation
The fat content of desiccated coconut is probably the most important single attribute. With almost two-thirds of its composition being coconut oil, with a melting point of 76°F/24.4°C, it is a factor to be seriously considered. Cool storage between 65-75°F/18.3-23.8°C is recommended. If stored above 76°F/24.4°C, under considerable stacking, oil separation can occur. This high-fat content also requires gentle handling and short mixing times for coconut candies so as to avoid the separation of coconut oil from the candy due to mechanical pressure. Solution: Despite the best efforts of candy makers in mixing and handling of coconut pastes, it is still possible to have separation occur during the forming operation. Almost every forming operation requires that a certain amount of pressure be applied to the coconut paste. There are formula modifications that can be made to minimize this fat separation, such as the addition of 0.5%-1% of glyceryl monosterate (GMS) to coconut paste. GMS should be added to coconut paste in liquid form to ensure even distribution throughout the batch. Addition of solid GMS to a cold batch could make the ingredient ineffective. Soapy Flavor
The high-fat content in desiccated coconut can lead to the development of soapy flavor when spoiled. Coconut fat represented by the triglyceride molecules in the presence of enzymes secreted by microorganisms (molds or yeast) breaks down into mono diglycerides and free fatty acid. Since 48% of the free fatty acid radicals in coconut fat are lauric acid, you quickly get the characteristic soapy flavor that lauric acid imparts. Solution: The use of hot water or steam blanching desiccated coconut results in extremely low microbiological counts and drastically reduces the chances for this soapy flavor development. Yellowing
Naturally occurring sugar and protein in coconut are responsible for the number one spoilage factor in this product: yellowing. Non-enzymatic browning, known as the Maillard reaction, gives coconut a yellow appearance is caused by the reaction between the natural sugars, particularly invert sugars and amino acids in the protein in coconut. Storage
Once a candy maker has received desiccated coconut, it is important to always use the oldest stock first and store in the coolest possible location. At around 40°F/4.4˚C, you get an almost indefinite shelf life of coconut. Particle Size
The tendency of a cut of desiccated coconut to yellow is almost directly related to its particle size—the larger the particle size, the greater the tendency to yellow. Extra fine or macaroon typically have the best whiteness retention, while slice and chip cuts, being cross sections of the coconut meat, yellow quickly on the inner surface. Coconut Recipe Ideas: Now that you’ve brushed up on your coconut knowledge, it’s time to get cooking—in the candy kitchen, that is. Here’s some inspiration for your next great coconut recipe. Toasted Coconut and Caramel Truffles
- Think of the popular Girl Scout cookie, Caramel deLites/Samoas, as inspiration for a caramel and toasted coconut patty, covered in chocolate. Take a look at this recipe for Samoa Truffles from Shugary Sweets. Five boxes, please!
Coconut Caramels
- The perfect summer twist to your caramel recipe! This recipe by Taste of Home uses coconut milk, shredded coconut and roasted almonds.
Spiced Cashew Coconut Brittle
- Add a little bite to cashew coconut brittle with the addition of black pepper. Check out this recipe from Martha Stewart.
Keto Coconut Truffles
- Appeal to the Keto diet craze by developing a recipe that highlights coconut with the simple addition of a natural sweetener, like honey or maple syrup, coconut oil, vanilla extract and salt. There are tons of recipes out there, but you could start by trying this recipe from blogger, Chocolate Covered Katie.
We hope you learned something and enjoy experimenting and perfecting your coconut recipes. Do you have a favorite coconut candy that you will highlight for National Coconut Day? If so, tell us about it in the comments below. Crave more? If you like what you read here, look for the "Subscribe now" box on the right to enter your email address and start receiving weekly tips, like this, delivered straight to your email inbox. RCI's Tip of the Week blog is just one of the many resources we offer to help candy makers refine their craft and build upon their business and marketing practices.
Tags:
Coconut
Recipe
Shelf Life
troubleshooting
Permalink
| Comments (0)
|
|
|
Posted By RCI,
Wednesday, May 27, 2020
Updated: Thursday, May 28, 2020
|
Looking to improve the efficiency of your candy kitchen? Rethinking the layout of your kitchen is a great place to start. RCI member Greg Power with Las Olas Confections and Snacks shares tips, plus which areas to focus on for the most impact in this week’s post.
Visualize
When reviewing your production layout, first, take measurements of your equipment and space. Draw a diagram of your space on paper; create scale cut outs of equipment and other movable items so you can move the items around easily. This will allow you to visualize the best placement of your equipment and help with layout options to maximize production and product flow.
Your production space should be enclosed and it should not open directly to outside areas; this will help with security and reduce exposure to outside elements. Smooth, walls, tile cove base and sealed concrete floors or tile flooring are all preferred for ease of cleaning and washing down. Storage racks should be off the ground and away from the walls (check for local health codes for how far off the ground and how far away from the walls is required). Any non-food contact equipment that can be stored or installed out of the production area is preferred and may open up additional kitchen space if stored elsewhere. Air compressors, boilers, cleaning equipment, etc. should all be stored away from production.
Production
The kitchen production area is the beginning of your entire process; which is why outflow from the kitchen should be smooth and effortless as the product moves to your production lines. If space permits, your kitchen should be separated, but adjacent to your slabbing or table room. This setup is the most efficient process for getting product off of the tables and on your production lines. If your tables are water-jacket cooled and you have a temperature-controlled cooling room available (at least 60˚F/15˚C), this will offer the most efficiency for cooling your products as quickly as possible from batch to production. You want to remove the heat from the product as fast as possible without sweating it.
Flow
From slabbing, product should go straight into enrobing or coating. This area should be as close to the slabbing or cutting area as possible. If you are hand dipping, multiple stations can be set up adjacent to the slabbing area. From enrobing or coating, products should flow straight into cooling tunnels then into the packing area. After packing, product may be stored in a cool, dry place for several days at 65˚ F/18˚C before transport.
Equipment
If space permits, avoid turns and curves within the process. Fewer transitions and handling of product will reduce labor. All equipment should be on legs, stands or wheels off the floor and away from walls; it should be easily accessible from all sides for easy cleaning and maintenance.
Production space should be limited to items needed for a specific run, excess equipment, cooling racks and raw materials. Work-in-process can reduce your ability to run efficiently and cause increased labor inefficiencies. Fine tuning some of these areas could have a surprising impact on the efficiency of your team.
Crave more? If you like what you read here, look for the "Subscribe now" box on the right to enter your email address and start receiving weekly tips, like this, delivered straight to your email inbox. RCI's Tip of the Week blog is just one of the many resources we offer to help candy makers refine their craft and build upon their business and marketing practices.
Not a member? Click here to learn how RCI can help you build your sweet business.
Tags:
Efficiency
Layout
Production
Productivity
Permalink
| Comments (0)
|
|
|
Posted By RCI,
Tuesday, May 19, 2020
Updated: Thursday, May 28, 2020
|
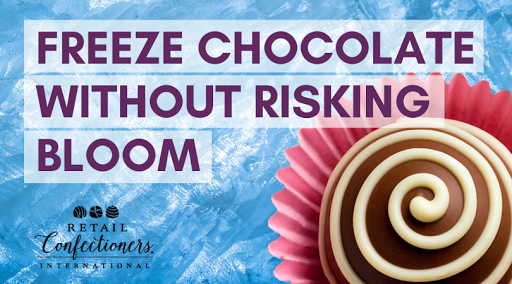
The mention of freezing chocolate products not too long ago was looked upon by candy makers as taboo. The two main concerns were bloom and loss of flavor.
Today, with new freezing systems and a better understanding of how to freeze products, it has become more common in the industry. Some of the largest manufacturers freeze products to keep up with seasonal demands. Keep reading for pro tips for successfully freezing and thawing chocolate in just a few simple steps, plus maximum storage times for both filled pieces and solid chocolates.
Freezing
1. Prepare the product
- Shrink wrap or wrap as tight as possible, making the package air tight.
- If you use stock boxes, it is best to double-shrink wrap them.
- Don’t have a shrink wrapper? A double layer of plastic wrap will work as well.
2. Maintain a stable freezing and thawing process.
- Most household or small commercial freezers can consistently maintain temperatures with short thaw cycles, if any.
- Opening and closing freezers increases humidity in the units, thus the need for defrosting.
- Larger operations should utilize freezers that have defrosting cycles.
- Proper freezer drainage and regular maintenance is key to ensuring stability.
- Evaluate defrosting time regularly. If this process takes too long, the packaging could get wet. If it is too short, the cost of freezing will increase due to the use of power.
Thawing*
*This may be the most important part of freezing.
1. Remove product from the freezer
- When removed from the freezer, product should be stored at 60˚ F/ 15˚ C, with limited humidity.
2. Create air movement around the thawing package
- Smaller operations can remove a stock box from the freezer and place it on a counter with a small fan blowing on the package.
- Larger operations can put a pallet on a rack with a fan blowing on one end.
- Do not open the package or remove the wrap until the product temperature rises up to room temperature.
- When opened at room temperature, the product will look and taste the same as it did before freezing.
For best results, thaw and sell frozen products within the recommended times below.
- Filled pieces and truffles should be 3-4 months.
- Solid chocolate pieces should be 6-8 months.
Freezing may not make sense for every company, as it is a major part of planning and operations for the companies that practice this method. You cannot hurry this process, but when executed properly it will increase shelf life by a few months and will not harm your products.
Crave more? If you like what you read here, look for the "Subscribe now" box on the right to enter your email address and start receiving weekly tips, like this, delivered straight to your email inbox. RCI's Tip of the Week blog is just one of the many resources we offer to help candy makers refine their craft and build upon their business and marketing practices.
Not a member? Click here to learn how RCI can help you build your sweet business.
Tags:
Chocolate
Freeze
Production
Shelf Life
Permalink
| Comments (0)
|
|