|
|
Posted By RCI,
Tuesday, April 2, 2024
Updated: Thursday, September 26, 2024
|
Are you tired of your candies sporting mysterious white splotches on their surface, commonly described as “stars?” RCI member Randy Hofberger of R&D Candy Consultants explains that the culprit behind these white splotches on the surface of grained confections like fudge and pralines is uncontrolled sugar graining. Taking control of sugar crystallization will not only improve the appearance of your products, but also contribute to a smoother mouthfeel by achieving a smaller crystal size.
So, how can you regain control over sugar crystallization?
FUDGE
There are several different ways to develop a grain in fudge. Influencing factors include the formula, temperature, process and time. While there can be many ingredients in a fudge formula—the ratio of sugar to syrups (aka doctoring agents, such as corn syrup, invert syrup, sorbitol, etc.) controls the rate of crystallization and to some extent crystal size. Basically, you need more sucrose solids than syrup solids to cause a grain. The higher the syrup percentage, the longer it will take to grain and the smaller the crystal size. It is difficult to control crystallization with a formula containing little or no syrup.
The two most common methods of graining fudge are:
1. Adding 10-20% fondant at a temperature below 175- 180°F to induce a grain. Transferring the cooked syrup to a cold kettle and adding chocolate liquor will help to cool down the mass. Lower percentages of fondant or hotter temperatures can result in uncontrolled sugar crystallization.
2. Mechanically developing a sugar crystal. For this method, the hot cooked mass is cooled to about 110-125°F, undisturbed before agitation begins. Agitation may be the mixing action of a cream beater or the working action of scrapers and paddles on a table—à la Mackinac Island fudge. Working the fudge at hotter temperatures can make a grainy, coarse textured fudge rather than one that is creamy and melt-in-your-mouth smooth.
PRALINES
Pecan pralines are also subject to having white spots on the surface. This is discussed in Walter Richmond’s book, Choice Confections. Many of the same issues and solutions used in fudge can be applied to pralines. More corn syrup in the formula will reduce spotting, but it will make the pieces less tender. As with fudge, the cooked mass should be cooled before starting the graining process. Most pralines are grained by rubbing the paddles on the side of the kettle until mixture appears cloudy. There is a little art involved and if done excessively the pralines will become sugary in appearance and texture. Another way of developing smooth sugar crystallization is to add fondant after it has been cooled.
A common challenge with pralines is when the last portion in the kettle becomes thick and over grained. Placing or nesting your kettle within another kettle will help to reduce heat loss and allow more time to deposit praline clusters before thickening occurs. Furthermore, nesting your kettle in another kettle with hot water will extend this time even more.
As mentioned earlier, formula, temperature, process and timing all affect the tendency of spotting to occur. While a night sky full of stars is good—candies dotted with stars is not!
Registration is now available for RCI’s 2024 Annual Convention & Industry Expo!
Register now and join us in Buffalo, New York June 17-21, 2024! Save with early-bird rates available through April 26, 2024.
Crave more?Click here
to subscribe and start receiving weekly tips, like this, delivered straight to your email inbox. RCI's blog is just one of the many resources we offer to help candy makers refine their craft and build upon their business and marketing practices.
Follow us on Facebook for even more sweet inspiration.
Not a member? Click here to learn how RCI can help you build your sweet business
.
Tags:
Fudge
Pralines
Sugar crystallization
troubleshooting
Permalink
| Comments (0)
|
|
|
Posted By RCI,
Tuesday, December 5, 2023
Updated: Tuesday, January 23, 2024
|
Hello, December! For many candy makers and chocolatiers this is the busiest time of the year. That’s why, for the next four weeks, we’re sharing some of our favorite candy hacks—quick and easy solutions to common confectionery conundrums. This week we’re sharing a quick fix for ganache if the chocolate and the fat separates. RCI member Robert Baker, of Sweet Tooth Candies, shares that instead of throwing out the batch, simply lay a sheet of butcher paper over the bowl of ganache for a minute or two. The paper will absorb the excess fat, leaving a smooth and silky ganache. Click here for RCI’s quick-reference guide for troubleshooting other common mishaps with chocolate. Stay tuned, next week we will share a surprising tip for making meltaways with untempered chocolate. Crave more?Click here to subscribe and start receiving weekly tips, like this, delivered straight to your email inbox. RCI's blog is just one of the many resources we offer to help candy makers refine their craft and build upon their business and marketing practices. Follow us on Facebook for even more sweet inspiration. Not a member? Click here to learn how RCI can help you build your sweet business.
Tags:
Candy Hacks
Chocolate
Ganache
troubleshooting
Permalink
| Comments (0)
|
|
|
Posted By RCI,
Tuesday, December 15, 2020
Updated: Thursday, January 21, 2021
|
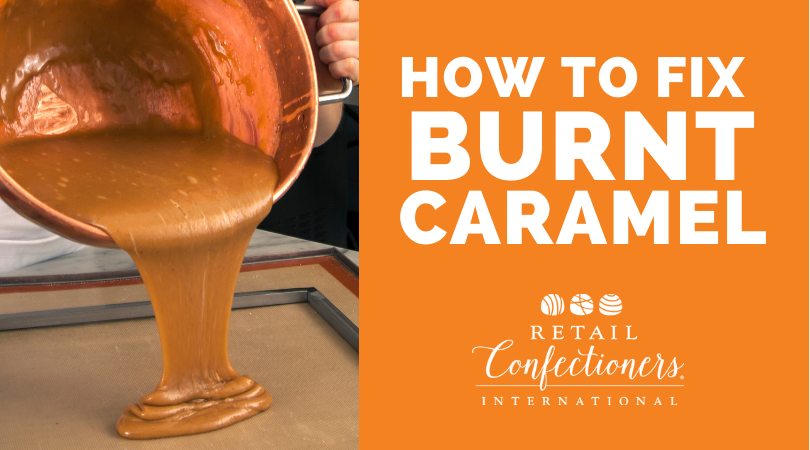
We’ve all heard the saying “don’t cry over spilled milk,” the same could be said for burnt caramel. Mistakes in the kitchen happen and sometimes there’s nothing you can do but put the mistake behind you and move on. Before pitching a botched batch of caramel, here are a couple quick fixes. One option would be to try masking the bitterness of burnt caramel by incorporating instant coffee into the mix. There is something comforting about this flavor combination, plus with an extra jolt of caffeine, the only tears shed over this concoction will be tears of joy. Try this recipe for cozy coffee caramels from TheSpruce.com. If you're feeling adventurous, embrace the burnt flavor and use it as an opportunity to get creative. According toFoodIngredientsFirst.com, “burnt caramel flavor pairs the sweet, milky notes of the caramel with the deep and slightly smoky characteristics of burning the caramel.” When life gives you burnt caramel, take the opportunity to transform it into something uniquely delicious. Share in the comments below if you have other solutions for fixing burnt caramel. Crave more? If you like what you read here, look for the "Subscribe now" box on the right to enter your email address and start receiving weekly tips, like this, delivered straight to your email inbox. RCI's Tip of the Week blog is just one of the many resources we offer to help candy makers refine their craft and build upon their business and marketing practices. Follow us on Facebook for even more sweet inspiration.
Tags:
Burnt Caramel
Caramel
troubleshooting
Permalink
| Comments (0)
|
|
|
Posted By RCI,
Tuesday, June 2, 2020
Updated: Thursday, July 30, 2020
|
 In honor of National Coconut Day on June 26, we’re sharing troubleshooting tips for working with coconut as well as inspiration for developing a new, craveable coconut candy that will make your fans go loco for coconut this summer! Coconut can come in many forms, but for confectioners, desiccated coconut is the most popular. Desiccated is defined as, “preserved by drying,” according to Merriam-Webster. The process of making desiccated coconutinvolves shredding unsweetened coconut meat that has been dehydrated and sifted to a range of different sizes. Shelf Life and Storage
Desiccated coconut is a low-moisture, high-fat product. Approximately 3% moisture content is necessary for desiccated coconut to be shelf stable. If moisture content is 5% or above, dried coconut will mold and spoil rapidly. Poly bags are an effective barrier against moisture pick up in transit and storage. However, dry storage conditions for desiccated coconut is recommended to maximize shelf life. With a low moisture product, such as this, any candy formulation has to be adjusted for the drying effect of such an ingredient. An alternative to this formula adjustment, of course, the premoistening of the desiccated coconut before addition to the candy batch. Oil Separation
The fat content of desiccated coconut is probably the most important single attribute. With almost two-thirds of its composition being coconut oil, with a melting point of 76°F/24.4°C, it is a factor to be seriously considered. Cool storage between 65-75°F/18.3-23.8°C is recommended. If stored above 76°F/24.4°C, under considerable stacking, oil separation can occur. This high-fat content also requires gentle handling and short mixing times for coconut candies so as to avoid the separation of coconut oil from the candy due to mechanical pressure. Solution: Despite the best efforts of candy makers in mixing and handling of coconut pastes, it is still possible to have separation occur during the forming operation. Almost every forming operation requires that a certain amount of pressure be applied to the coconut paste. There are formula modifications that can be made to minimize this fat separation, such as the addition of 0.5%-1% of glyceryl monosterate (GMS) to coconut paste. GMS should be added to coconut paste in liquid form to ensure even distribution throughout the batch. Addition of solid GMS to a cold batch could make the ingredient ineffective. Soapy Flavor
The high-fat content in desiccated coconut can lead to the development of soapy flavor when spoiled. Coconut fat represented by the triglyceride molecules in the presence of enzymes secreted by microorganisms (molds or yeast) breaks down into mono diglycerides and free fatty acid. Since 48% of the free fatty acid radicals in coconut fat are lauric acid, you quickly get the characteristic soapy flavor that lauric acid imparts. Solution: The use of hot water or steam blanching desiccated coconut results in extremely low microbiological counts and drastically reduces the chances for this soapy flavor development. Yellowing
Naturally occurring sugar and protein in coconut are responsible for the number one spoilage factor in this product: yellowing. Non-enzymatic browning, known as the Maillard reaction, gives coconut a yellow appearance is caused by the reaction between the natural sugars, particularly invert sugars and amino acids in the protein in coconut. Storage
Once a candy maker has received desiccated coconut, it is important to always use the oldest stock first and store in the coolest possible location. At around 40°F/4.4˚C, you get an almost indefinite shelf life of coconut. Particle Size
The tendency of a cut of desiccated coconut to yellow is almost directly related to its particle size—the larger the particle size, the greater the tendency to yellow. Extra fine or macaroon typically have the best whiteness retention, while slice and chip cuts, being cross sections of the coconut meat, yellow quickly on the inner surface. Coconut Recipe Ideas: Now that you’ve brushed up on your coconut knowledge, it’s time to get cooking—in the candy kitchen, that is. Here’s some inspiration for your next great coconut recipe. Toasted Coconut and Caramel Truffles
- Think of the popular Girl Scout cookie, Caramel deLites/Samoas, as inspiration for a caramel and toasted coconut patty, covered in chocolate. Take a look at this recipe for Samoa Truffles from Shugary Sweets. Five boxes, please!
Coconut Caramels
- The perfect summer twist to your caramel recipe! This recipe by Taste of Home uses coconut milk, shredded coconut and roasted almonds.
Spiced Cashew Coconut Brittle
- Add a little bite to cashew coconut brittle with the addition of black pepper. Check out this recipe from Martha Stewart.
Keto Coconut Truffles
- Appeal to the Keto diet craze by developing a recipe that highlights coconut with the simple addition of a natural sweetener, like honey or maple syrup, coconut oil, vanilla extract and salt. There are tons of recipes out there, but you could start by trying this recipe from blogger, Chocolate Covered Katie.
We hope you learned something and enjoy experimenting and perfecting your coconut recipes. Do you have a favorite coconut candy that you will highlight for National Coconut Day? If so, tell us about it in the comments below. Crave more? If you like what you read here, look for the "Subscribe now" box on the right to enter your email address and start receiving weekly tips, like this, delivered straight to your email inbox. RCI's Tip of the Week blog is just one of the many resources we offer to help candy makers refine their craft and build upon their business and marketing practices.
Tags:
Coconut
Recipe
Shelf Life
troubleshooting
Permalink
| Comments (0)
|
|
|
Posted By RCI,
Tuesday, October 1, 2019
Updated: Monday, April 27, 2020
|
Brittles are a popular confection, with formulations that can be adjust to feature any variety of nuts, seeds and even dried fruit. In an excerpt from RCI’s Kettle Talk magazine, Randy Hofberger of R&D Candy Consultants shares how to achieve great tasting product with consistency.
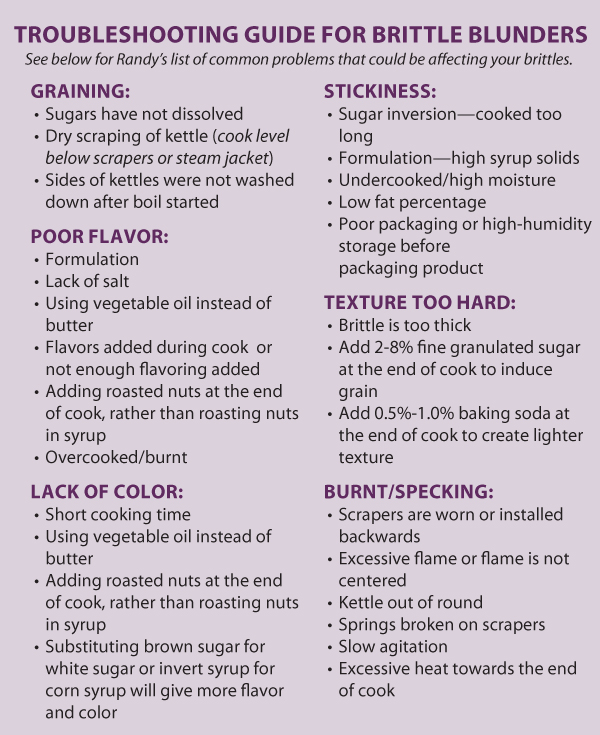
This hard, glassy candy is not typically coated with chocolate, which makes it great for consumers to enjoy year around! There is no standard of identity for brittles (also known as butter crunch, nut crisps, etc.), but they generally contain sugar, corn syrup, butter, nuts, salt, flavorings and often bicarbonate of soda (baking soda).
While there are many formulas to make brittles, some typical values are:
- Sugar/corn syrup ratio of 2:1
- Milk fat: 1-15%
- Nuts: 20-30%
- Salt: 0.2-1.0%
- Emulsifiers: lecithin 0.25%, mono and diglycerides 0.5-1.5%
- Bicarbonate of soda: 0.5-1.0% (if used)
- Sufficient water to dissolve the sugars
The basic procedure to make brittles is to combine the sugar, corn syrup, emulsifier and water and bring to a boil, washing down the sides of the kettle to prevent premature graining. If your formula has a high percentage of fat/butter (such as with a butter crunch), you will want to add this at the beginning of the cook to ensure it is well incorporated. At approximately 240ºF, raw nuts are added to be roasted in the boiling syrup. Adding the nuts at this time will provide the necessary amino acids to start the Maillard reaction, which will contribute to the color and flavor of the brittle.
As the temperature approaches 280ºF, the flame is lowered if there is evidence of scorching. When the final cook temperature (usually 295–310ºF) is reached, flavoring, low levels of butter, salt and baking soda may be added. The cooked candy is taken to a warm cooling table to be stretched and cooled. Thin pieces of brittle will give a bite that is more tender. When cooled, the product must be properly packaged to maintain the crunchy texture, since brittles will absorb moisture.
Brittles can be a popular and profitable part of your candy portfolio due to their flavor, texture and resistance to heat. Like all confections, consistency is key. Consistent product requires consistent ingredients added in a consistent manner, cooked to the same temperature and for the same amount of time. Processes for cooling, transferring, packaging and storage should also be consistent.
Crave more? If you like what you read here, look for the "Subscribe now" box on the right to enter your email address and start receiving weekly tips, like this, delivered straight to your email inbox. RCI's Tip of the Week blog is just one of the many resources we offer to help candy makers refine their craft and build upon their business and marketing practices.
Tags:
Brittle
Formulations
troubleshooting
Permalink
| Comments (0)
|
|
|
Posted By RCI,
Tuesday, April 16, 2019
Updated: Monday, April 27, 2020
|
As consumers, we love chocolate-covered nuts because they represent not one, but multiple craveable characteristics. Crunchy – check! Sweet and salty – check! Plus, as a good source of protein and healthy fats, they are often categorized as being a healthier and more satisfying treat!
However, when combining nuts and chocolate in confections oil migration often presents problems. Oil migration between the chocolate and nut or nut paste leads to changes in the quality of the confection, such as visible surface bloom, hardening of the filling and softening of the chocolate.
While oil migration is inevitable when pairing chocolate and nuts together, the following techniques will help avoid or slow oil migration, pulled from education led by Guittard Chocolate Company and the Oregon Hazelnut Marketing Board at RCI’s 2018 Fall Regional Conference in Portland, Oregon last fall.
- If using roasted hazelnuts, use a two-step roasting process.
- Select a chocolate with a fine particle size.
- Ensure the chocolate is well-tempered.
- When adding hazelnuts or hazelnut paste to tempered chocolate, the temperature of the hazelnuts should be within 1-2˚F of the temperature of the tempered chocolate.
- A thicker layer of chocolate around a hazelnut or hazelnut filling slows oil migration, bloom formation and textural change.
- Double enrobing with cooling between layers.
- Consider the shape and design of the confection to limit thin spots of coating.
- During storage, limit temperature fluctuations.
With these expert tips for fighting oil migration, you can create truly craveable treats using hazelnuts and other nuts. RCI members: Login at retailconfectioners.org/pasteducation to access this and other education recordings from past RCI events.
Crave more? If you like what you read here, look for the "Subscribe now" box on the right to enter your email address and start receiving weekly tips, like this, delivered straight to your email inbox. RCI's Tip of the Week blog is just one of the many resources we offer to help candy makers refine their craft and build upon their business and marketing practices.
Tags:
bloom
Chocolate
Chocolate-Covered Nuts
Nuts
Oil Migration
troubleshooting
Permalink
| Comments (0)
|
|
|
Posted By RCI,
Tuesday, February 26, 2019
Updated: Monday, April 27, 2020
|
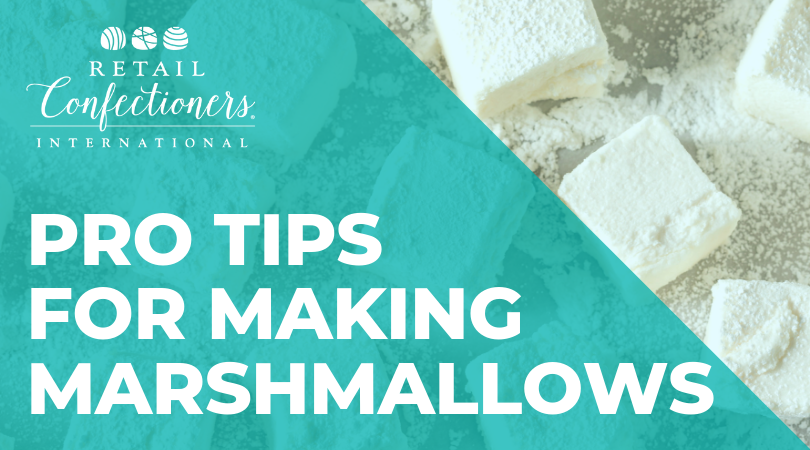
Looking for ways to improve efficiency and cut down on the mess when making marshmallows? Here’s some quick expert tips for cutting, dusting and packaging your marshmallows.
Cutting
When cutting small batches of marshmallow, RCI members have recommended the following ways to be most efficient:
- A guitar cutter works, but it really depends on how soft your marshmallow recipe is. As an alternative, a sharp pizza cutter works well too. – J. Sofia, Cargill Cocoa & Chocolate
- We use a lightly buttered, sharp, thin-bladed knife. [We re-apply the butter] every 2 or 3 rows. It's a bit slow, but eliminates the need for corn starch, which I found made the marshmallows difficult to coat. –W. Spence, Spence Candies
Dusting
Dusting marshmallows is an important step to preserve that soft and pillowy texture that we desire. Traditionally candy makers use powdered sugar or corn starch to keep marshmallows from drying out and becoming hard. Aside from the cloud of dust they leave everywhere, a coating of powdered sugar can make your already sweet marshmallows too sweet and corn starch can make it difficult for chocolate to stick to the marshmallow.
As an alternative to the traditional corn starch and powdered sugar, try replacing them with dextrose or fondant sugar (such as Amerfond® Fondant Sugar). Both products will help you achieve the desired affect and with less the mess. For marshmallows bound for the enrober, adding a little dextrose to the top and bottom will also help the chocolate stick.
If air bubbles are a problem when enrobing square confections, like marshmallows, send them through your enrober corner first. Your products will receive better chocolate coverage from the fountains on the enrober and you will decrease the chance for bubbles to appear on the tops.
Packaging
Have you ever noticed condensation (or worse, mold) on the inside of your marshmallow packaging? If so, you may be cutting and packaging your marshmallows too soon. Of course you want your marshmallows to be as fresh as possible, but marshmallow needs to breathe for a while or else the warmth may create moisture and you may experience mold on your product. A general rule of thumb is to let marshmallow sit overnight before cutting, dusting and storing it.
If you’ve ever questioned whether making your own marshmallow is worth the hassle, these expert tips will not only make your job easier, they will leave your customers wanting more of these fluffy confectionery wonders!
Crave more? If you like what you read here, look for the "Subscribe now" box on the right to enter your email address and start receiving weekly tips, like this, delivered straight to your email inbox. RCI's Tip of the Week blog is just one of the many resources we offer to help candy makers refine their craft and build upon their business and marketing practices.
Tags:
Candy Making
Marshmallow
troubleshooting
Permalink
| Comments (0)
|
|
|
Posted By RCI,
Tuesday, January 22, 2019
Updated: Monday, April 27, 2020
|
With a pinch of moisture and a dash of heat, you’ve got the recipe to ruin perfectly good chocolate. But we’re not looking to ruin chocolate here! It may not be easy, but as a chocolatier, you are expected to craft delicious chocolate with a glossy sheen and perfect snap every time, without fail. However, thanks to a myriad of factors that can negatively affect your chocolate at any given point, even the most skilled chocolatiers can have off days in the kitchen. To help, we’ve created this quick-reference guide to pinpoint common mishaps that can occur when working with chocolate so they can be easily corrected.
Chocolate is dry and powdery
When you rub chocolate and it feels dry and powdery, say “hello” to sugar bloom. Sugar bloom is caused by moisture. Dew forms on chocolate and gets absorbed by the sugar, leaving a dusty layer of crystals.
Causes:
- High humidity (50% humidity or less is best)
- Cooling temperature was too low (below 50° F)
- Chocolates with a moist center were stored in a high-temperature room.
Chocolate feels greasy
If your chocolate feels greasy, you've got fat bloom. Fat bloom is caused when cocoa butter separates and moves to the surface of chocolate.
Causes:
- Centers made with soft fats. Many nut centers can also cause fat bloom when in contact with incompatible fats.
- Proper storage temperature was not maintained.
Chocolate doesn't release properly from mould
Are your chocolate moulds putting up a good fight? Learn how to fight back with common causes for sticky moulds.
Causes:
- Mould was too cold or too warm, causing chocolate in contact with the mould to lose temper.
- Mould was not clean.
- Too much or too little seed when tempering.
- Sugar bloom (see above)
- Center was too cool. Center must be close to the temperature of the chocolate.
Cracks in finished product
Sure, that chocolate bunny with a crack down the middle can still taste good, but it doesn't exactly send the right message to customers. Learn what's causing the problem below, so you can avoid it in the future.
Causes:
- Cooling temperature was too low (below 50° F)
- Chocolate was in the cooler too long.
- Low viscosity of the chocolate
Other considerations
If you've covered all the bases above and are still unsure what's wreaking havoc in your candy kitchen, here's a few other common culprits you may have overlooked.
- Local climate conditions can greatly affect the environment of your candy kitchen and, in turn the results of your finished products. Take care to create an ideal environment for working with chocolate.
- Chocolate picks up and holds odor. Be careful when using products with a strong odor near chocolate, such as mint and even cleaning products.
- Be mindful of where air vents are blowing. Avoid air vents blowing directly on product.
- Keep moisture far from your chocolate making areas. A dishwasher giving off a bit of steam can have a negative effect on any product that is near it.
- Do not cook near chocolate. If you make caramel, for example, it should be made in a separate area.
Mistakes happen. Learn from your mistakes and the mistakes of others through education and talking with fellow candy makers. By understanding what could go wrong and how to avoid or correct mistakes, you can avoid a great deal of unnecessary costs and frustration.If you have questions that are not addressed in this post, RCI members can login to pose questions to fellow members on RCI’s online forum, List Serve.
RCI's Tip of the Week blog is just one of the many resources we offer to help candy makers refine their craft and build upon their business and marketing practices. Review past blog posts for quick and actionable tips to apply to your business. Look for the "Subscribe now" box on the right to enter your email address and start receiving weekly tips, like this, delivered straight to your email inbox.
Not a member? Click here to learn how RCI can help you build your sweet business.
Tags:
bloom
Chocolate
Cracks
List Serve
Moulds
Tempering
troubleshooting
Permalink
| Comments (0)
|
|
|
Posted By RCI,
Tuesday, May 23, 2017
Updated: Wednesday, April 29, 2020
|
Checking your temper is an important step to ensure you aren’t surprised by unsightly bloom or dull or tacky chocolates.
Chocolates that have a dull appearance may be over tempered, while rapid bloom or a tacky, greasy surface are indicators that chocolate is under tempered. Quit guessing and rest assured your chocolate is always in good temper with these two methods for checking your temper.
- The Blade Test: This method is quick, easy and budget friendly, however the results could vary on the temperature of the room.
Simply dip a metal spatula or knife blade into the chocolate and leave a small film on the blade. At room temperature (65-68° F), well-tempered chocolate should be firm, not tacky, after just five minutes.
- Tempermeter: Although more costly, this method will most accurately measure the degree of tempering, indicating the quality and quantity of stable crystals that have been formed.
Tempermeters produce a temperature versus time curve, resulting from uniform cooling of a chocolate sample over a specified period of time.
It may be easy to assume your chocolate is well tempered and ready to move into the assembly line, however, skipping this step could result in a costly mistake.
Choose a testing method that works best for you and put a plan in place to ensure your chocolate is being checked on a regular basis. Many of our candy maker members have a system in place to verify their chocolate’s temper every hour.
Connect with fellow confectioners and industry suppliers at RCI's Annual Convention & Industry Expo next month! Register online now and join us in Chicagoland June 12-16, 2017!
Tags:
bloom
Chocolate
Chocolate Production
dull finish
Quality Control
temper
troubleshooting
Permalink
| Comments (0)
|
|
|
Posted By RCI,
Tuesday, April 18, 2017
Updated: Wednesday, April 29, 2020
|
During an RCI candy making course in 1971, the instructor discovered two students, although using identical formulas for rolled creams, were achieving vastly different results due to a variation in their cooking time. Keep reading to ensure your cooking time isn’t compromising the quality of your creams and other products.
Cooking Time for Rolled Creams, By Fred Janssen, SuCrest Corp.
While teaching at the RCI Short Course on Retail Candy Making, it was interesting to learn the following from two of the students who were trying to make the same type of candy. In this case, rolled creams. After questioning the students, an interesting fact was revealed. In one case, the cooking time of the batch was 8 minutes and in the other, 45 minutes. Both were using the identical formulas as suggested by many in the trade and it was quite evident that the student who took the longer cooking time was not getting good results. There was a great deal of variation in the type of product that he was trying to make.
Rolled creams are dependent upon the crystalline structure or the sugar remaining in the cream and with the longer cooking time, excessive inversion took place which reduced the percentage or amount of sugar remaining in the cream, thereby causing a great deal of difficulty for the candy maker.
A good rule to follow in any cooking operation is that all batches should be cooked to its final temperature within 20 minutes. If this is not possible on the equipment, the size of the batch should be reduced so that this cooking time can be accomplished. If larger batches are necessary, consideration should be given to making changes by obtaining better cooking equipment.
It's important to be mindful of cooking times, and not just ingredient formulations, when adjusting batch sizes. The 20-minute rule can help candy makers keep their cooking times in check and prevent excessive inversion.
Tags:
Candy Making
Creams
From the Archives
troubleshooting
Permalink
| Comments (0)
|
|