|
|
Posted By RCI,
Tuesday, January 9, 2024
Updated: Tuesday, January 23, 2024
|
Suffer from sweaty sea salt caramels? You're not alone. Many candy makers have faced this common issue and shared possible solutions in the RCI member forum, The Candy Dish. When making sea salt caramels, finishing with high-quality sea salt is best. However, even with quality salt, storing salted caramels in a cool room with 50% humidity can still cause the salt to sweat or become clear on the caramel. Here are four RCI member tips to prevent similar problems when storing sea salt caramels: 1. Some salts are harder than others. Use a harder and more dense salt, such as pink Himalayan sea salt, which is less likely to absorb moisture. 2. Store sea salt caramels at room temperature, rather than reducing the temperature. 3. Dehumidify your storage area to at least 40%. 4. Shrink wrap the boxes or cases to completely enclose the product before storing. Nobody likes a sweaty sea salt caramel! Give these tips a try to keep your sea salt caramels dry. Crave more?Click here to subscribe and start receiving weekly tips, like this, delivered straight to your email inbox. RCI's blog is just one of the many resources we offer to help candy makers refine their craft and build upon their business and marketing practices. Follow us on Facebook for even more sweet inspiration. Not a member? Click here to learn how RCI can help you build your sweet business.
Tags:
Candy Hacks
Permalink
| Comments (0)
|
|
|
Posted By RCI,
Tuesday, December 19, 2023
Updated: Tuesday, January 23, 2024
|
For many candy makers and chocolatiers this is the busiest time of the year. That’s why, for the month of December, we’re sharing some of our favorite candy hacks—quick and easy solutions to common confectionery conundrums. This week we’re sharing a pro tip for pulling brittle with greater consistency. Do you ever have trouble with staff stretching large slabs of brittle in an inconsistent manner? By cutting brittle into several smaller strips rather than one large slab, RCI member Kevin Wenzel of Wiseman House Chocolates has been able to reduce waste and produce product with a more even thickness.
After pouring and spreading, run a large metal spatula under the brittle to break the cold/heat bond from the cooling table. Then cut the brittle into several long sections and stretch on one side, then flip each section over and stretch it again. This approach will help achieve more even thickness and reduce the amount of product from the edges that is scrapped. Stay tuned, next week we will share tips for prevent your sea salt caramels from sweating.Crave more?Click here to subscribe and start receiving weekly tips, like this, delivered straight to your email inbox. RCI's blog is just one of the many resources we offer to help candy makers refine their craft and build upon their business and marketing practices. Follow us on Facebook for even more sweet inspiration. Not a member? Click here to learn how RCI can help you build your sweet business.
Tags:
Brittle
Candy Hacks
Permalink
| Comments (0)
|
|
|
Posted By RCI,
Monday, December 11, 2023
Updated: Tuesday, January 23, 2024
|
For many candy makers and chocolatiers this is the busiest time of the year. That’s why, for the month of December, we’re sharing some of our favorite candy hacks—quick and easy solutions to common confectionery conundrums. This week we’re sharing a pro tip for making meltaways. The most common way to make a meltaway is to combine tempered chocolate with melted coconut oil until it is smooth. Because coconut oil is a lauric fat, it must be added at a lower temperature so not to throw the chocolate out of temper. If the chocolate becomes untempered (or was never tempered to start with) the nice, smooth texture of the meltaway will eventually be replaced with an unpleasant mouthfeel due to the formation of fat globules. Mixing Things Up
Consider this alternative method to making stable, smooth-textured meltaways with untempered chocolate. Instead of adding fat to tempered chocolate, combine untempered chocolate and coconut oil in a mixer. Mix at a slow speed until the temperature is below 78ºF/25.5ºC and has visibly thickened. Referred to as the “mixer method,” it achieves the same desired stability and texture the meltaway is revered for, without the hassle of keeping temper. Stay tuned, next week we will share a simple trick for greater consistency when spreading brittle. Crave more?Click here to subscribe and start receiving weekly tips, like this, delivered straight to your email inbox. RCI's blog is just one of the many resources we offer to help candy makers refine their craft and build upon their business and marketing practices. Follow us on Facebook for even more sweet inspiration.
Tags:
Candy Hacks
Permalink
| Comments (0)
|
|
|
Posted By RCI,
Tuesday, December 5, 2023
Updated: Tuesday, January 23, 2024
|
Hello, December! For many candy makers and chocolatiers this is the busiest time of the year. That’s why, for the next four weeks, we’re sharing some of our favorite candy hacks—quick and easy solutions to common confectionery conundrums. This week we’re sharing a quick fix for ganache if the chocolate and the fat separates. RCI member Robert Baker, of Sweet Tooth Candies, shares that instead of throwing out the batch, simply lay a sheet of butcher paper over the bowl of ganache for a minute or two. The paper will absorb the excess fat, leaving a smooth and silky ganache. Click here for RCI’s quick-reference guide for troubleshooting other common mishaps with chocolate. Stay tuned, next week we will share a surprising tip for making meltaways with untempered chocolate. Crave more?Click here to subscribe and start receiving weekly tips, like this, delivered straight to your email inbox. RCI's blog is just one of the many resources we offer to help candy makers refine their craft and build upon their business and marketing practices. Follow us on Facebook for even more sweet inspiration. Not a member? Click here to learn how RCI can help you build your sweet business.
Tags:
Candy Hacks
Chocolate
Ganache
troubleshooting
Permalink
| Comments (0)
|
|
|
Posted By RCI,
Tuesday, February 22, 2022
Updated: Wednesday, April 13, 2022
|
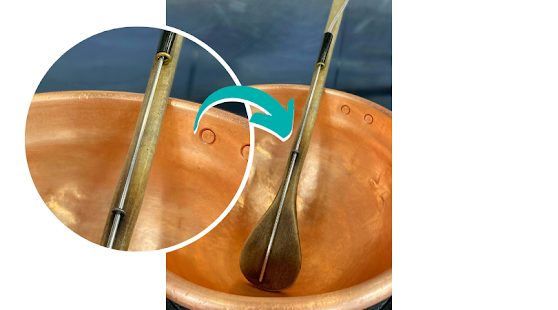
If your candy thermometer has ever got in the way of stirring a bubbling hot candy concoction, then you’ll appreciate this week’s quick and easy hack. RCI member Hilliard’s Chocolates makes approximately 5,000 pounds of their signature almond toffee crunch each year. With all the stirring it takes to whip up that much toffee, the Hilliard’s team developed a simple, yet, innovative solution for keeping that sometimes pesky candy thermometer in its rightful place. As pictured above, Hilliard’s has screwed two eye hooks into their wooden paddle, so the thermometer slips right into place, preventing it from getting in the way while stirring. Even small adjustments like this can make a big impact in improving efficiency. Do you have any simple hacks that improve your efficiency in the candy kitchen? If so, we’d love for you to share on RCI’s Facebook page. Crave more?Click here to subscribe and start receiving weekly tips, like this, delivered straight to your email inbox. RCI's blog is just one of the many resources we offer to help candy makers refine their craft and build upon their business and marketing practices. Follow us on Facebook for even more sweet inspiration. Not a member? Click here to learn how RCI can help you build your sweet business.
Tags:
Candy Hacks
Candy Making
Thermometer
Permalink
| Comments (0)
|
|
|
Posted By RCI,
Tuesday, August 4, 2020
Updated: Monday, August 24, 2020
|
August may have just begun, but when you see school supplies fill the store aisles, you know fall is just around the corner.
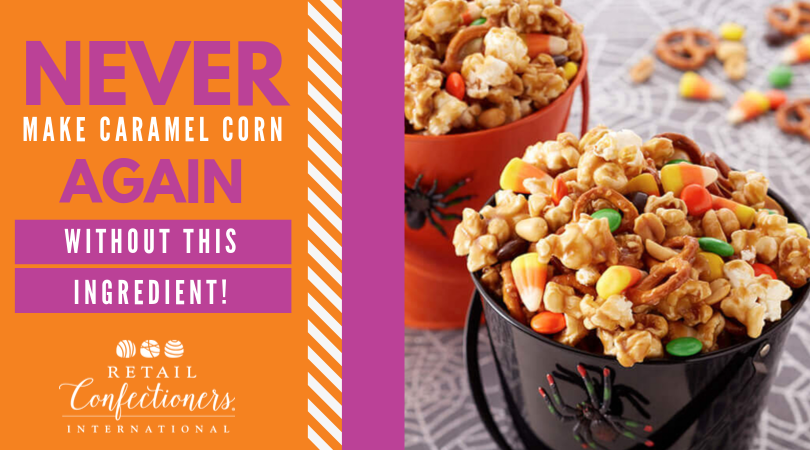
There's something warm and comforting about caramel corn in the fall--but sticky, clumpy caramel corn is no fun at all! After reading this week's quick tip, you will never want to make caramel corn without this ingredient!
If your caramel corn sticks together and becomes difficult to separate, adding lecithin will help. Randy Hofberger of R&D Consultants advises mixing lecithin with a little oil and adding this mixture at the end of your caramel corn recipe. This will help the caramel spread apart easier and save you the hassle of manually pulling it apart.
Allergy Alert!
It is advised that individuals with soy allergies do not consume products that contain lecithin. Although lecithin is a byproduct of soy, there is always a chance soy protein will find its way into lecithin. Lecithin derived from sunflower or canola are more allergy-friendly alternatives to soy.
Don’t cry over spilled lecithin.
Resist the urge to clean spilled lecithin with a damp cloth or spray cleaner, which will cause it to gum-up and make it worse. Instead, cover the spill with sugar and it will clean right up without a sweat.
New Flavor Inspiration
Once you’ve perfected your caramel popcorn recipe, consider experimenting with different flavors and ingredients to take your corn to the next level. Here’s some inspiration for the upcoming fall season.
Bourbon Caramel
Equally suited as a tailgate party snack or a jolly holiday treat, bourbon caramel corn will keep ‘em coming back for more.
Dulce de Leche
Dulce de leche is a South American delicacy made with slow-cooked milk and sugar. A natural fit for caramel corn, it offers a rich, creamy and more complex flavor for your caramel popcorn.
Pumpkin Spice
Is it even fall without pumpkin spice? We don’t think so!
In the past, Starbucks has released their pumpkin spice latte as early as the end of August. Get ready for the craze by introducing pumpkin spice caramel corn for this fall season.
Here’s to making your best batches of caramel corn ever and to a sweet fall season!
Crave more? If you like what you read here, look for the
Not a member? Click here to learn how RCI can help you build your sweet business.
Tags:
Allergens
Candy Hacks
Caramel
Caramel Corn
Creative Flavors
Fall
Inspiration
Lecithin
Liquor
Popcorn
Problem Candy
Pumpkin Spice
Recipe
Seasonal
Sticky Caramel
Permalink
| Comments (0)
|
|
|
Posted By RCI,
Tuesday, June 30, 2020
Updated: Thursday, July 30, 2020
|
Have you ever experienced problems with caramel slipping off your caramel apples? The wax on your apple may be the culprit. By simply wiping each apple with a damp cloth prior to dipping, you can remove the waxy residue that rests on the apples. An apple naturally produces a waxy film to protect itself, however, in some instances additional food-grade wax is added by suppliers to further increase an apple’s shelf life. For this reason, it could save you time and effort to request unwaxed apples from your supplier, if they do add wax to their apples. If that doesn’t help, consider adding white compound to your caramel at a 5 to 1 ratio to help it better adhere to the apple. If you can’t wait to test this out, here’s a few summer-inspired caramel apples ideas to try too! Patriotic Caramel Apples
Show your patriotic stripes with drizzles of red and blue over a white chocolate coated caramel apple. 
Zesty Coconut Caramel Apples
Think tropical by adding a generous helping of toasted coconut and a little lime zest to your caramel apples. 
Wormy Caramel Apple
Turn shoppers heads with these fun, wormy caramel apples! S’mores Caramel Apples
Transform your caramel apples into a s’mores lover’s dream by adding layers of graham crackers, marshmallows and drizzled chocolate. Was this tip helpful? If so, let us know in the comments below. Crave more? If you like what you read here, look for the "Subscribe now" box on the right to enter your email address and start receiving weekly tips, like this, delivered straight to your email inbox. RCI's Tip of the Week blog is just one of the many resources we offer to help candy makers refine their craft and build upon their business and marketing practices. Not a member? Click here to learn how RCI can help you build your sweet business.
Tags:
4th of July
Apple
Candy Hacks
Caramel
Caramel Apple
Caramel Apples
Caramels
Coconut
Idea Sharing
Inspiration
Problem Candy
S'mores
Something on a Stick Day
Summer
Permalink
| Comments (0)
|
|
|
Posted By RCI,
Tuesday, October 22, 2019
Updated: Monday, April 27, 2020
|
There's something warm and comforting about caramel corn in the fall--but sticky, clumpy caramel corn is no fun at all! After reading this week's quick tip, you will never want to make caramel corn without this ingredient!
If your caramel corn sticks together and becomes difficult to separate, adding lecithin will help. Randy Hofberger of R&D Consultants advises mixing lecithin with a little oil and adding this mixture at the end of your caramel corn recipe. This will help the caramel spread apart easier and save you the hassle of manually pulling it apart.
Allergy Alert! It is advised that individuals with soy allergies do not consume products that contain lecithin. Although lecithin is a byproduct of soy, there is always a chance soy protein will find its way into lecithin. Lecithin derived from sunflower or canola are more allergy-friendly alternatives to soy.
Don’t cry over spilled lecithin.
Resist the urge to clean spilled lecithin with a damp cloth or spray cleaner, which will cause it to gum-up and make it worse. Instead, cover the spill with sugar and it will clean right up.
Make It Festive
With the quick addition of ingredients like pretzels, roasted nuts, candy corn and colorful candy-coated chocolates this sweet and salty treat is easily be transformed into a festive trail mix for fall parties, trips to the pumpkin patch and tail gate parties.
Crave more? If you like what you read here, look for the "Subscribe now" box on the right to enter your email address and start receiving weekly tips, like this, delivered straight to your email inbox. RCI's Tip of the Week blog is just one of the many resources we offer to help candy makers refine their craft and build upon their business and marketing practices.
Tags:
Candy Hacks
Caramel Corn
Fall
Lecithin
Permalink
| Comments (0)
|
|
|
Posted By RCI,
Tuesday, December 11, 2018
Updated: Monday, April 27, 2020
|
With the holidays upon us, we’re sharing a quick and easy tip for achieving softer creams.
Did you know the type of corn syrup you use can affect the texture of your creams? Get softer, creamier creams by using corn syrup with a higher dextrose equivalent (DE).
Problems with creams that dry out? Corn syrup with a higher dextrose equivalent will create greater humectancy (or moisture retention) within your creams.
RCI's Tip of the Week blog is just one of the many resources we offer to help candy makers refine their craft and build upon their business and marketing practices. Review past blog posts for quick and actionable tips to apply to your business. Look for the "Subscribe now" box on the right to enter your email address and start receiving weekly tips, like this, delivered straight to your email inbox.
Not a member? Click here to learn how RCI can help you build your sweet business.
Tags:
Candy Hacks
Candy Making
Creams
Permalink
| Comments (0)
|
|
|
Posted By RCI,
Tuesday, September 25, 2018
Updated: Monday, April 27, 2020
|
Since strawberries soak up water like a sponge, which can lead to moldy or mushy berries, it is important to be mindful of how you wash your strawberries before coating them in chocolate.
If you don’t plan on using your strawberries right away, experts agree it is best to store them in the refrigerator and wash them no more than a couple hours before using them. If you hull your strawberries before coating them, wait to do so until after they are washed. Cut strawberries will absorb even more water, making them more susceptible to mold, while also diluting their flavor. Below are two member-recommended methods for washing strawberries to make them last, we suggest experimenting to find which method works best for you.
Damp cloth method: Since strawberries are often prewashed, some experts suggest wiping strawberries with a damp cloth instead of submerging them in water to keep the moisture content low. Keep in mind as much as strawberries like to soak up water, they are equally adept at soaking up other things like pesticides. If you choose this method, consider sourcing strawberries from local farms that don’t use pesticides or are certified organic.
Vinegar solution method: If you prefer a more thorough cleaning, RCI member, Luisa Chocolatier, recommends washing strawberries in a solution of cold water and non-pasteurized apple cider vinegar (use approximately 3 tablespoons for every one gallon of water). After, first, wiping away any dirt with a clean towel and discarding unwanted mushy or moldy berries, gently submerge berries in the vinegar solution for five minutes. Next, place the strawberries in a colander to drain excess water before placing in a single layer on top of a dry towel to air dry. Once the strawberries are dry, they can be placed in their original containers, which have since been cleaned and dried as well, until they are ready to dip.
Since excess water will prevent chocolate from sticking to strawberries and also cause chocolate to have a dull appearance, both methods emphasize the importance of drying strawberries before dipping them into chocolate. Try one of these methods and let us know which works best for you!
RCI's Tip of the Week blog is just one of the many resources we offer to help candy makers refine their craft and build upon their business and marketing practices. Review past blog posts for quick and actionable tips to apply to your business. Look for the "Subscribe now" box on the right to enter your email address and start receiving weekly tips, like this, delivered straight to your email inbox.
Not a member? Click here to learn how RCI can help you build your sweet business.
Tags:
Candy Hacks
Chocolate
Chocolate Production
Shelf Life
Strawberries
Permalink
| Comments (0)
|
|


.png)