|
|
Posted By RCI,
Tuesday, June 9, 2020
Updated: Thursday, July 30, 2020
|
Impress your customers all year around with 3D moulded chocolates. RCI member, Chef Brian Donaghy with Tomric Systems shares step-by-step instructions for working with both solid and hollow moulds, plus important considerations when it comes to tempering and cooling. Start with Good Temper It seems fairly basic, but before we dive into moulding chocolate, I feel compelled to note that proper moulding techniques all start with chocolate in good temper. Good temper leads to appropriate viscosity (90˚F/32˚c or below for 3D moulding), which ultimately leads to better finished pieces, whether that be your three-foot hollow bunny, your solid chocolate Santa pop or the shell to that beautifully decorated artisan-style praline. We are always looking for bubble-free chocolate, of even thickness throughout the moulded piece with the beautiful shine and snap that will delight our customer. How can we get there? Solid Moulds Many 3D moulds are designed as an open or closed format. The open format allows the mould to be made hollow or solid, while the closed format only allows for hollow manufacturing. Solid forming is fairly straight forward; clip the two (or more pieces) together, fill with chocolate, (bubble-free is easier to achieve, if you vibrate the mould while filling) and set filled mould in a cool space with air flow—I prefer 50˚F/10˚C for my refrigeration temperature. Leave the mould there until you can see the chocolate pulling away from the inside of the plastic. If the chocolate piece experiences breakage during this time, I will often remove some of the clips and turn the mould onto its base to finish the crystallization process. Once the piece is ready to be unmoulded, I remove it from the cool space and allow it to return to room temperature before I unmould. Waiting this little bit, helps to prevent sugar bloom or condensation on the piece. If the mould has flash (chocolate on the seam that slipped between the plastic sides), cut it off with a utility knife or sharp paring knife and then use compressed air or a badger-style brush to remove the excess chocolate. Hollow Moulds The process for creating hollow moulded chocolates is similar to the solid, but after filling it while vibrating the mould, set the mould aside at room temperature for a couple minutes. Next, pour the chocolate from the mould back into the temperer. Repeat this process until the piece is the appropriate weight or thickness. Create the bottom of the piece, by pouring tempered chocolate onto a lined sheet pan, slightly bigger than the base of the mould. Stand the mould into that pool of chocolate and place the mould and sheet pan in a cool space. Like the solid piece, remove clips early if there is breakage, and bring the piece back to room temperature before unmoulding. The extra chocolate around the base of the mould can be easily removed prior to opening the mould by placing a knife between the mould and the chocolate, it should just break away if the chocolate is finished crystallizing. Cooling Time What amount of time is best to store chocolates in a cool space before removing the mould? This will depend on a few factors; the size of the mould, how much chocolate the mould uses and the actual temperature of the space. Regardless of these variables, remember that no matter the size, amount of chocolate or room temperature, you will get more consistent results if that space has moving air, because moulding chocolate that has been properly tempered requires heat exchange created by airflow. Follow this expert advice to achieve bubble-free moulded chocolates with a beautiful shine and snap. Crave more? If you like what you read here, look for the "Subscribe now" box on the right to enter your email address and start receiving weekly tips, like this, delivered straight to your email inbox. RCI's Tip of the Week blog is just one of the many resources we offer to help candy makers refine their craft and build upon their business and marketing practices. Not a member? Click here to learn how RCI can help you build your sweet business.
Tags:
Moulds
temper
Permalink
| Comments (0)
|
|
|
Posted By RCI,
Wednesday, September 11, 2019
Updated: Monday, April 27, 2020
|
Impress your customers during the holidays and year around with 3D moulded chocolates. Brian Donaghy of Tomric Systems shares step-by-step instructions for working with both solid and hollow moulds, plus important considerations when it comes to tempering and cooling.
Start with Good Temper
It seems fairly basic, but before we dive into moulding chocolate, I feel compelled to note that proper moulding techniques all start with chocolate in good temper. Good temper leads to appropriate viscosity (90 or below for 3D moulding), which ultimately leads to better finished pieces, whether that be your three-foot hollow bunny, your solid chocolate Santa pop or the shell to that beautifully decorated artisan-style praline. We are always looking for bubble-free chocolate, of even thickness throughout the moulded piece with the beautiful shine and snap that will delight our customer. How can we get there?
Solid Moulds
Many 3D moulds are designed as an open or closed format. The open format allows the mould to be made hollow or solid, while the closed format only allows for hollow manufacturing. Solid forming is fairly straight forward; clip the two (or more pieces) together, fill with chocolate, (bubble-free is easier to achieve, if you vibrate the mould while filling) and set filled mould in a cool space with air flow—I prefer 50˚F for my refrigeration temperature. Leave the mould there until you can see the chocolate pulling away from the inside of the plastic. If the chocolate piece experiences breakage during this time, I will often remove some of the clips and turn the mould onto its base to finish the crystallization process. Once the piece is ready to be unmoulded, I remove it from the cool space and allow it to return to room temperature before I unmould. Waiting this little bit, helps to prevent sugar bloom or condensation on the piece. If the mould has flash (chocolate on the seam that slipped between the plastic sides), cut it off with a utility knife or sharp paring knife and then use compressed air or a badger-style brush to remove the excess chocolate.
Hollow Moulds
The process for creating hollow moulded chocolates is similar to the solid, but after filling it while vibrating the mould, set the mould aside at room temperature for a couple minutes. Next, pour the chocolate from the mould back into the temperer. Repeat this process until the piece is the appropriate weight or thickness. Create the bottom of the piece, by pouring tempered chocolate onto a lined sheet pan, slightly bigger than the base of the mould. Stand the mould into that pool of chocolate and place the mould and sheet pan in a cool space. Like the solid piece, remove clips early if there is breakage, and bring the piece back to room temperature before unmoulding. The extra chocolate around the base of the mould can be easily removed prior to opening the mould by placing a knife between the mould and the chocolate, it should just break away if the chocolate is finished crystallizing.
Cooling Time
What amount of time is best to store chocolates in a cool space before removing the mould? This will depend on a few factors; the size of the mould, how much chocolate the mould uses and the actual temperature of the space. Regardless of these variables, remember that no matter the size, amount of chocolate or room temperature, you will get more consistent results if that space has moving air, because moulding chocolate that has been properly tempered requires heat exchange created by airflow.
Follow this expert advice to achieve bubble-free moulded chocolates with a beautiful shine and snap.
Crave more? If you like what you read here, look for the "Subscribe now" box on the right to enter your email address and start receiving weekly tips, like this, delivered straight to your email inbox. RCI's Tip of the Week blog is just one of the many resources we offer to help candy makers refine their craft and build upon their business and marketing practices.
Tags:
Chocolate
Cooling
Moulds
Production
temper
Permalink
| Comments (0)
|
|
|
Posted By RCI,
Wednesday, April 18, 2018
Updated: Monday, April 27, 2020
|
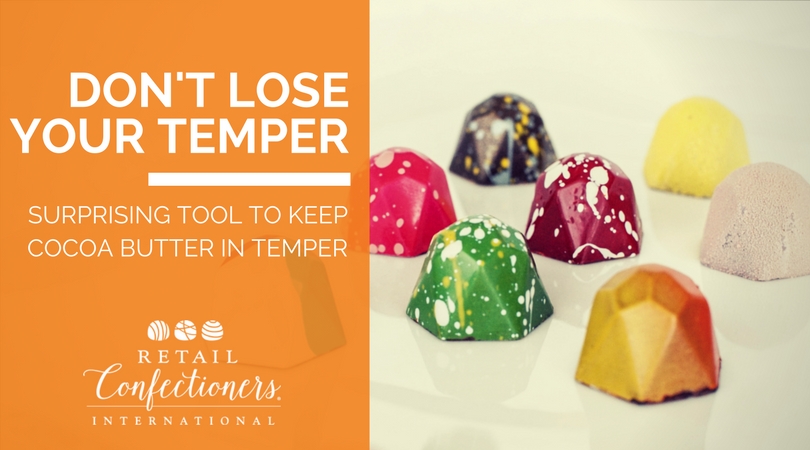
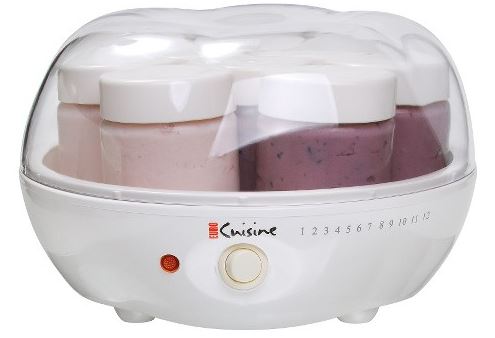
Using an airbrush to apply colored cocoa butter to your chocolate moulds can help create a dramatic effect. But if you are using several colors at once, it may seem like a juggling act to keep them all in proper temper.
RCI member, Brian Donaghy with Tomric Systems, Inc, says although colored cocoa butter usually arrives tempered, it is important to heat it slowly and then hold the cocoa butter in a 90℉ environment. Brian recommends using a yogurt maker to retain the temperature over time and help ensure the cocoa butter doesn't lose temper.
With lots of options available online, most ranging in price from $29-$60, this piece of equipment could prevent your airbrushed chocolates from having a dull finish or sticking to the moulds.
Tags:
Airbrush
Colored Cocoa Butter
Moulds
temper
Permalink
| Comments (0)
|
|
|
Posted By RCI,
Tuesday, November 28, 2017
Updated: Monday, April 27, 2020
|
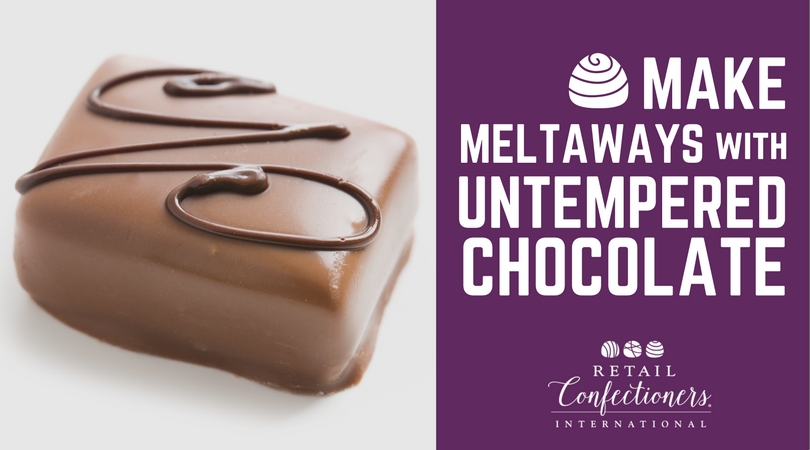
The most common way to make a meltaway is to combine tempered chocolate with melted coconut oil until it is smooth. Because coconut oil is a lauric fat, it must be added at a lower temperature so not to throw the chocolate out of temper. If the chocolate becomes untempered (or was never tempered to start with) the nice, smooth texture of the meltaway will eventually be replaced with an unpleasant mouthfeel due to the formation of fat globules.
Mixing Things Up
Consider this alternative method to making stable, smooth-textured meltaways with untempered chocolate. Instead of adding fat to tempered chocolate, combine untempered chocolate and coconut oil in a mixer. Mix at a slow speed until the temperature is below 78º F and has visibly thickened. Referred to as the “mixer method” in curriculum shared at RCI’s Chocolate Boot Camp®, it achieves the same desired stability and texture the meltaway is revered for, without the hassle of keeping temper.
Newcomers and veterans alike are invited to learn techniques of chocolate making, like this, during RCI’s Chocolate Boot Camp February 19-22, 2018 in Waterbury, CT at Fascia’s Chocolates. This popular hands-on course covers topics such as:
- Tempering
- Moulding
- Enrobing
- Chocolate Artistry
- and more!
SPACE IS VERY LIMITED! This course is expected to sell out! For complete information and to register online, visit retailconfectioners.org/bootcamp.
Tags:
Candy Hacks
Candy Making
Chocolate
Chocolate Boot Camp
Coconut Oil
Meltaways
temper
Permalink
| Comments (0)
|
|
|
Posted By RCI,
Tuesday, May 23, 2017
Updated: Wednesday, April 29, 2020
|
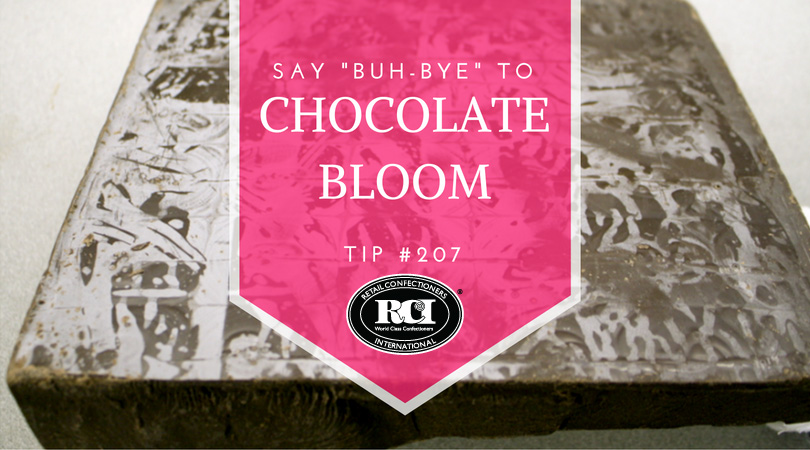
Checking your temper is an important step to ensure you aren’t surprised by unsightly bloom or dull or tacky chocolates.
Chocolates that have a dull appearance may be over tempered, while rapid bloom or a tacky, greasy surface are indicators that chocolate is under tempered. Quit guessing and rest assured your chocolate is always in good temper with these two methods for checking your temper.
- The Blade Test: This method is quick, easy and budget friendly, however the results could vary on the temperature of the room.
Simply dip a metal spatula or knife blade into the chocolate and leave a small film on the blade. At room temperature (65-68° F), well-tempered chocolate should be firm, not tacky, after just five minutes.
- Tempermeter: Although more costly, this method will most accurately measure the degree of tempering, indicating the quality and quantity of stable crystals that have been formed.
Tempermeters produce a temperature versus time curve, resulting from uniform cooling of a chocolate sample over a specified period of time.
It may be easy to assume your chocolate is well tempered and ready to move into the assembly line, however, skipping this step could result in a costly mistake.
Choose a testing method that works best for you and put a plan in place to ensure your chocolate is being checked on a regular basis. Many of our candy maker members have a system in place to verify their chocolate’s temper every hour.
Connect with fellow confectioners and industry suppliers at RCI's Annual Convention & Industry Expo next month! Register online now and join us in Chicagoland June 12-16, 2017!
Tags:
bloom
Chocolate
Chocolate Production
dull finish
Quality Control
temper
troubleshooting
Permalink
| Comments (0)
|
|
|
Posted By RCI,
Tuesday, December 27, 2016
Updated: Wednesday, April 29, 2020
|
We've curated the most-read tips from 2016, to pinpoint topics that are most important to candy makers.
From troubleshooting tips to sky-high merchandising inspiration, plus a customer service must-read, the following posts deliver quick and easily executed tips to simply the lives of confectioners, like you!
Suffer from sweaty sea salt caramels? Take tips from fellow candy makers and RCI members on how to avoid this common problem.
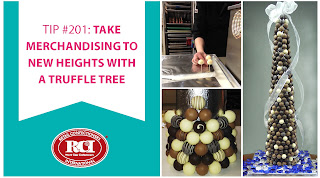
Get step-by-step instructions for creating this eye-catching truffle tree.
RCI MEMBER BONUS: Click here to login to RCI’s member site and snag three variations of ganache recipes on page 9 of RCI’s Kettle Talk magazine.
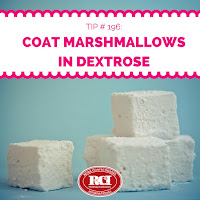
Nobody likes hard, dried-out marshmallows! Keep your ‘mallows soft and pillowy all year long with this popular tip of the week.
An oldie, but a goodie, this throwback from 2012 covers four customer service basics that are too important not to review with your team on a regular basis.
Bloom is easily identified as one of the most common problems facing candy makers. No surprise, this post tops the list with common causes of chocolate bloom, as well as simple solutions.
Tags:
bloom
Candy Hacks
Candy Making
Caramel
Chocolate
Chocolate Production
Customer Service
Employee Management
Idea Sharing
Marshmallow
Merchandising
Problem Candy
Recipe
temper
Truffles
Tutorial
Permalink
| Comments (0)
|
|
|
Posted By RCI,
Tuesday, March 1, 2016
Updated: Wednesday, April 29, 2020
|
Last week, twenty-seven chocolatiers participated in Retail Confectioners International’s Chocolate Boot Camp®. Although students in the course varied in age and experience, each of them graduated with a better understanding of working with chocolate.
“No matter what size your company is or how long you have been in business, there is always something to learn at Chocolate Boot Camp," says Michael Crudden, Vice President of Operations at Rosalind Candy Castle and 2016 course graduate.
We’ve snagged 3 quick tips from this popular course to share with you! Even if you’re a seasoned vet, you may be surprised to learn something that you can incorporate into your business.
Tip #1: Some centers need to be cooled in order to make them firm enough to hold their shape. If centers are too cold, they will cause the chocolate coating to crack and have a dull finish. Ideally, centers should be between 65-75 degrees Farenheit when coated in chocolate.
Tip #2: When using chocolate moulds, avoid bloom by making sure the moulds are 4 degrees Fahrenheit cooler than the chocolate.
Tip #3: If you don’t have a tempermeter, dip a knife blade into chocolate, leaving a thin film on the blade. If the chocolate is firm and not tacky in 5 minutes, at normal room temperature (65-68 degrees Farenheit), it is in good temper.
Not a member? Click here to learn how RCI can help you build your sweet business.
Tags:
bloom
Candy Hacks
Candy Making
Chocolate
Chocolate Boot Camp
Chocolate Production
crack
dull finish
Education
Moulds
temper
Permalink
| Comments (0)
|
|